Showing posts with label Cuttlebug. Show all posts

Friday, February 6, 2015

SOUS Die Cut Challenge - Key To My Heart

     Hi and welcome to my blog! First I want to say I am so sorry this is up so late. Life got away from me and I forgot but I have it up now :) Today we have a new challenge from SOUS and it is called Key To My Heart. At first I thought of using a really cute svg file from Miss Kate Cuttables but I decided to go a different route. Anything chocolate, especially cupcakes, are the Key To My Heart so I am going to use the literal meaning of Key To My Heart.
     I am using a standard A2 card base of 4-1/4" by 5-1/2" to start off my project. Next I chose to use a cupcake from Cricut cartridge Sweet Treats cut at 4-1/2". I
decided to use Valentine colors to using the suggested colors in the booklet. I embossed the top of the cupcake to give some dimension to the frosting and added some cute sequins as candy sprinkles. The sentiment on the bottom is using a die cut from My Craft Spot. It is hard to see the dimension of it
sticking out but it gives a little more flair to the card. Here are all the details:


  • Cricut cart: Sweet Treats
  • Paper: Doodlebug Lovebugs
  • Cardstock: Bazzill
  • Ribbon: Really Reasonable Ribbon
  • Sequins: Own Stock
  • Stamp: My Pink Stamper
  • Ink: Versafine Onyx Black
  • Banner: My Craft Spot
  • Adhesive: Scotch, Zig
     Thanks so much for coming to my blog and looking at my Stuck On U Sketches Die Cut Challenge - Key To My Heart project. This card was so much fun putting together with all the extras. My favorite part would have to be the banner. Love the dimension. Well, have a great weekend everyone and thanks again for coming! :)

Thursday, June 12, 2014

SOUS Die Cut Challenge - Animal


     I am so super excited for today's post as it is my first for the Die Cut team over at SOUS where I am already a member on their Project Life team. Today's challenge was to do a project with an animal on it so I chose to do this really cute baby boy card. I started with the Cricut Lite cartridge B is for Boy for the zebra and the Cricut Lite cartridge 9 Months for the blocks. I cut the zebra out at 4" and the blocks out at 2". Here are the details:

  • Cricut carts: B is for Boy, 9 Months
  • Paper: DCWV
  • Cardstock: Bazzill
  • Brads: Doodlebug
  • Cuttlebug: D'vine Swirl
  • Metal Die: My Craft Spot - Tiny Tags
  • Stamp: My Craft Spot - Tiny Tags 2
  • Ink: Versafine - Onyx Black
  • Adhesive: Scotch
     I really hope you like my first die cut project as there will be many more to come. I really hope you join this challenge because as an added bonus SOUS has a sponsor this month and it is...
     You have the chance to win 3 sets of any cuts on their site! How exciting is that! Thank you so much for looking at my post and all the others on the SOUS Die Cut team today and I hope you have a great weekend.

Tuesday, April 29, 2014

Hello Kitty card

If you are looking for my SOUS Project Life challenge then just scroll down please. Here is a card I made for a challenge over at Fantabulous Cricut. 

Wednesday, February 19, 2014

Alligator Birthday card

Hi again! Here is another card that I created. I love the colors in this card. They are so bright and always make me think birthday! I first used the Sketch Challenge on Fantabulous Cricut to get the design of my card. Then I used the Puns Challenge over at My Craft Spot for the Snappy Birthday saying. The alligator is cut at 1-1/2" which may seem small but if you cut him much larger you will need a longer card. My card base is 4-1/4"x 5-1/2". This was a very easy card to make. Here are the details:

  • Cricut cart: Birthday Bash
  • Cardstock: Bazzill
  • Pattern paper: Echo Park "That's My Boy"
  • Cuttlebug: Spots and Dots
  • Twine: We R Memory Keepers
  • Stamp: My Pink Stamper "More Punny-licious"
  • Ink: Versafine
  • Adhesive: Scotch, Zig
I really hope you enjoy this card. It was such a blast to make. Hope you have a great day! :)

Sunday, January 26, 2014

SOUS Project Life Challenge - Embossing


     Well here is my page for the Stuck On U Sketches Project Life Embossing Challenge. I used a Becky Higgins Design E page for my page then I decided to dry emboss one of the 4 quarters. I used my Cuttlebug and Cuttlebug folder Snowflakes for the embossing. I had to emboss the paper twice because the folder isn't 6 inches wide. It was pretty easy with this folder as the snowflakes aren't lined up. Other embossing folders could prove to be more difficult if used. After embossing I placed the vellum saying on with brads and placed the snowflakes all around. This is a pretty easy challenge to try, and don't forget we are giving away blog candy on our main site if you enter any of the projects this month. Up your chances and do more then one challenge!
     One of our co-founders wanted us to talk a little about starting Project Life since it was the beginning of the New Year. So I thought about writing about what you will need to start such a venture. I found it way more easy if you start out with the simple basics like the pocket pages, an album, and some sort of 3x4 and 4x6 cards. I will admit I stuck with mainly Becky Higgins products because she had all the basics. I got her Big Variety pack of pocketed page protectors, a couple of core kits and a We R Memory Keepers album. It will cost around $80, but if you happen to find a really good sale at Michaels with coupons it can be purchased for a lot less. There is also mini kits, kit clubs, and other card kits you can buy from other manufactures too but you don't really need them to start.
     I hope this helps someone out there who is thinking of starting some sort of Project Life scrapping. Good luck and just have fun with it. The best part of it is there are no rules on how you do it, so just do it and fall in love with it like I have. :) Have a great week and please if you have any questions feel free to leave a comment. 

Thursday, October 31, 2013

13 Nights of Halloween #13

     Welcome to the last night of my 13 Nights of Halloween event. I really hope you have had a great time viewing all my projects for the last 12 days. Thanks so much for coming to my blog to see them. Today I have a real treat for you...a Halloween mini album! The album is 6" x 6". I used several different kings of materials in and on this album to make it all spooky. So I decided to create a video for you to watch:


Here are the details:

  • Cricut cart: Happy Hauntings, Chic & Scary, Mini Monsters
  • Paper: Basic Grey, Doodlebug, K & Company
  • Plastic spiders & Bats, Mesh: Dollar Store
  • Hinge & Key hole: Tim Holtz
  • Black Key: Walmart
  • Charms: Own stash
  • Sizzix cuts: File Folder, Tag-Super
  • Brads: Making Memories
  • Buttons: Michaels
  • Ribbon: Really Reasonable Ribbon
  • Rhinestones: Kaiser scrapbook
  • Stamps: My Pink Stamper "Spook-alicious", "Spooky Puns"
  • Ink: Versafine in Onyx Black
  • Embossing Powder: Stampendous
  • Stickles: Xmas Red
  • Punches: Martha Stewart
  • Adhesive: Scotch, Zig


     Thanks again for coming to my blog to see my 13 Nights of Halloween projects. And remember I am still having a giveaway for your chance to win a Halloween tp mini album. Just leave a comment below on how you liked what you have seen. I will pick a winner either tomorrow or the day after. Also better your chances by leaving comments on all the others nights as well. Have a great day! :)

Wednesday, October 23, 2013

13 Nights of Halloween #5

     Welcome again to my blog and my 13 Nights of Halloween event. Here we are at night number 5 and a new project for you. Today I decided to make a 3D item. These coffins are so fun to make and even easier to put together. They come from the Cricut cartridge Happy Hauntings. I cut the taller one out at 3-3/4" and the other one at 3". Here are the rest of the details:

  • Cricut cart: Happy Hauntings, Mini Monsters, and Plantin Schoolbook
  • Paper: Bazzill
  • Cuttlebug: Quatrefoil
  • Tag: My Craft Spot
  • Ribbon: Ofray
  • Stamp: My Pink Stamper "Spooky Puns"
  • Ink: Versafine in Onyx Black, Color Box in Alabaster
  • Twine: Doodlebug
  • Adhesive: Scotch. Zig
     Thanks again for following me on this little event I have going on and please don't forget that I am having a giveaway with a chance to win a really cute Halloween tp mini album. It will be premiering on the 8th night. Thanks for stopping by and looking too. Have a great day! :)

Sunday, July 28, 2013

40th Birthday Cake Card

     I love the look on this cakes face and it couldn't be anymore appropriate for my sister in law's 40th birthday card from me to her. I really hope she loves it and I think she will.
     I started out by using the Gypsy cart Smiley Cards. You can only get it for the Gypsy but the last time I looked you couldn't get it for that anymore. So I'm sorry to those who can't and would of loved to make this cake.
     I cut the cake out at 4-1/2". I didn't like the idea of the candles being the same color of the cake as the initial cut calls for so I cut an extra and cut the candles off to place on here. I colored the flames with Stickles and mounted it on a 4"x 5-1/4" layer and mounted that onto a 4-1/4"x 5-1/2" card. Here are the details:

  • Cricut cart: Smiley Cards
  • Paper: Bazzill
  • Twine: We Are Memory Keepers
  • Stickles: Yellow and Fruit Punch
  • Cuttlebug: Happy Birthday
  • Adhesive: Scotch, Recollections, Zig 2-way
     Please enjoy the card and thank you so much for looking at it. I can't wait for my SIL to open it! Have a great day. :)

Thursday, May 23, 2013

Welcome Baby card

     Here is my latest card that I have made. I love how it turned out. The card itself is 4-1/4 x 5-1/2 inches. I started by using the Cricut cartridge Baby Steps. There are so many cute images on this cartridge. I cut the image out at 4-1/2". I also used for the first time, my Tiny Doilies Metal Dies from My Craft Spot. They are so much fun to work with and come with so many configurations. Here are the rest of the details:

  • Cricut cart: Baby Steps
  • Cardstock: Bazzill
  • Pattern paper: DCWV Baby Girl
  • Metal dies: My Craft Spot
  • Stamps: My Pink Stamper "Sweet Baby", My Craft Spot "Stampin' Around Spring"
  • Cuttlebug: Divine Swirls
  • Brads: Doodlebug
  • Twine: Doodlebug
  • Ink: Versafine and CTMH Heavenly Pink
  • Adhesive: Scotch, Recollections
     I hope you enjoy the card and thanks so much for looking. Have a great day! :)

Saturday, April 13, 2013

Butterfly card

Here is card number 2 for the day. I made this card in response to My Craft Spot's challenge of doing a project with a cute critter on it. I choose a butterfly for my critter because I have so been wanting to do this one. It is from the Cricut cartridge Tinker Bell and Friends. This cart some some beautiful projects on it and it is also my fave cart and the first one I bought. I also used Twinkle Toes for the lacy background. I cut the butterfly at 3-3/4" and the lacy part at 5". The card is 6"x 6". Here are the details:

  • Cricut cart: Tinker Bell and Friends, Twinkle Toes
  • Paper: Bazzill
  • Stickles: Glam Pink, Orange Peel
  • Cuttlebug: Polka Dots
  • Flowers: Dollar Tree
  • Brads: Making Memories
  • Adhesive: ATG, Zig 2 way glue, Recollections pop dots
Thanks so much for looking at my 2 submissions for the day. I also submitted this card in 3 more challenges:


Have a great day!

Cake card

Well, here is my newest creation. I am doing the challenge over at Fantabulous Cricut and I had so much fun making this card. The challenge is to use the color yellow and a triangle shape. I put yellow in my cake and the triangle is the top of the cake. I used the Cricut card Sweet Treats and cut the cake at 3-1/2. I cut the wording at 2-1/2. I then put ribbon around the top layer and pop dotted the slice of cake and just glued the wording on. Here are the details:

  • Cricut cart: Sweet Treats
  • Paper: Bazzill
  • Cuttlebug: Swiss Dots
  • Ribbon: Ofray
  • Pen: White Uni-ball Signo
  • Stickles: Glam Pink
  • Adhesive: ATG, Zig 2 way glue, Recollections pop dots
I hope you enjoy my card and are having a fantastic weekend so far. Thanks so much for looking.

Monday, March 25, 2013

Easter card

I did it! 2 posts within a week. Congrats me. Enough of that, here we have a very cute Easter chick card that I whipped up in about 3 hrs. It's very simple to complete. I cut the chick from Create a Critter 2 at 4". The fence is a Sizzix die that I cut on my Cuttlebug. I embossed the background paper with Cuttlebug's Traffic die. 

Here are the details: 
  • Cricut cart: Create a Critter 2
  • Paper: Bazzill, Three Bugs in a Rug
  • Twine: Doodlebug
  • Die Cut: Sizzix "Yellow die-Picket Fence
  • Embossing: Cuttlebug's "Traffic"
  • Adhesive: ATG, Zig 2-way glue, Recollections Pop dots
I am entering this card into the following challenges:
Thanks so much for looking at my blog. I hope you enjoy it.

Wednesday, March 20, 2013

Hello Kitty card

Well, here I am again with a new card. My Craft Spot is having a challenge right now to make something with embossing either dry or wet. And then Fantabulous Cricut is having a challenge as well that is to make something with either a balloon or kite on it. So I decided to go ahead and make a card with both elements included and I think it came out cute. I decided to use Hello Kitty Greetings from Cricut and also Create a Critter for the kite. Here is the recipe:

  • Cricut carts: Hello Kitty Greetings & Create a Critter
  • Paper: Bazzill
  • Cuttlebug folders: Juli's Garden & Swiss Dots
  • Ribbon: American Crafts
  • Twine: Doodlebug
  • Button: Making Memories
  • Adhesive: ATG, Zig 2-way, Zots Pop Dots, & Glue Dots
The card size is 5-1/2"x 4-1/4". I am also entering this card into Card Makin' Mamas. I hope you enjoy this one as much as I did making it. Thanks so much for looking and have a great weekend!

Sunday, December 16, 2012

Hot Chocolate Cup card

Here is another Christmas card or just an everyday winter day card as it is not Christmas related. This would be great for those friends or family members who don't celebrate the holidays. This card is so super simple to make.
     I used the Cricut cartridge Winter Frolic. This has completely become my favorite go to cartridge for the holidays and winter cuts. I cut the cup at 4-1/2" with the card being 4-1/4"x 5-1/2". I used my Cuttlebug and Swiss Dots folder on the layer and then stitched around the edge. It's hard to see in the picture. I then placed the cup onto this layer using pop dots and then stamped the saying from My Pink Stamper "Happiest Moments". I then adhered the whole thing onto the pink card base. Here are the details:

  • Cricut card: Winter Frolic
  • Paper: Bazzill and Basic Grey
  • Cuttlebug: Swiss Dots
  • Stamp: My Pink Stamper "Happiest Moments"
  • Thread: Coats and Clark
  • Sewing Machine: Janome
Thanks for looking and please enjoy!

Saturday, December 15, 2012

Bell Card

Here is a card I did for a challenge over at Fantabulous Cricut. The challenge is to make a project with a bell on it. I choose the bell off of the Cricut cartridge Jolly Holidays. Here are the details:

  • Cricut cart: Jolly Holidays
  • Paper: Bazzill and Daisy D's
  • Ribbon: Unknown
  • Silver studs: I-Rock
  • Cuttlebug: Tag and Seeing Spots
  • Adhesive: Scotch, Ek Success Zig 2 Way Glue
I hope you enjoy it and thanks very much for looking!

Saturday, December 8, 2012

12 Days of Christmas - Day 8

Today I have a really simple card for you. The whole card took me about 20 min to make so these would make great last minute cards to give away with holiday goodies or to send to family and friends. I got the idea here. I fell in love with it the minute I saw it and knew I wanted to try and make it too.
     The tree only consists of different size circles that I cut on my Cricut using Plantin Schoolbook. I cut the circles at 2", 3", 4", and 5", but you could use any sizes you like. I then folded each circle in half then turned it and folded it in half again. Then you just fold in the sides and push the circle flat. I then glued the smallest circle down first leaving room for my star. Then I placed the next circle inside of the smaller circle and glued it down. Repeat with each remaining circle. I Cuttlebug the green layer before I did any gluing and then put a red stud in each corner with my I-Rock tool. I love that thing!:) I cut the star from my Cricut as well using the same cartridge at 3/4". I used Icicle Stickles to make it sparkle like a star should. I glued the whole thing onto a red card base using my ATG gun. Here are the details:

  • Cricut cart: Plantin Schoolbook
  • Paper: Bazzill and Basic Grey
  • Cuttlebug: Paper Studio-Swirls
  • Studs: I-Rock tool
  • Stickles: Icicle
  • Adhesive: Scotch, and Ek Success 2 Way Glue

     I hoped you enjoyed today's card and I will see you again tomorrow for day 9. Thanks for looking!:) 

Thursday, December 6, 2012

12 Days of Christmas - Day 6

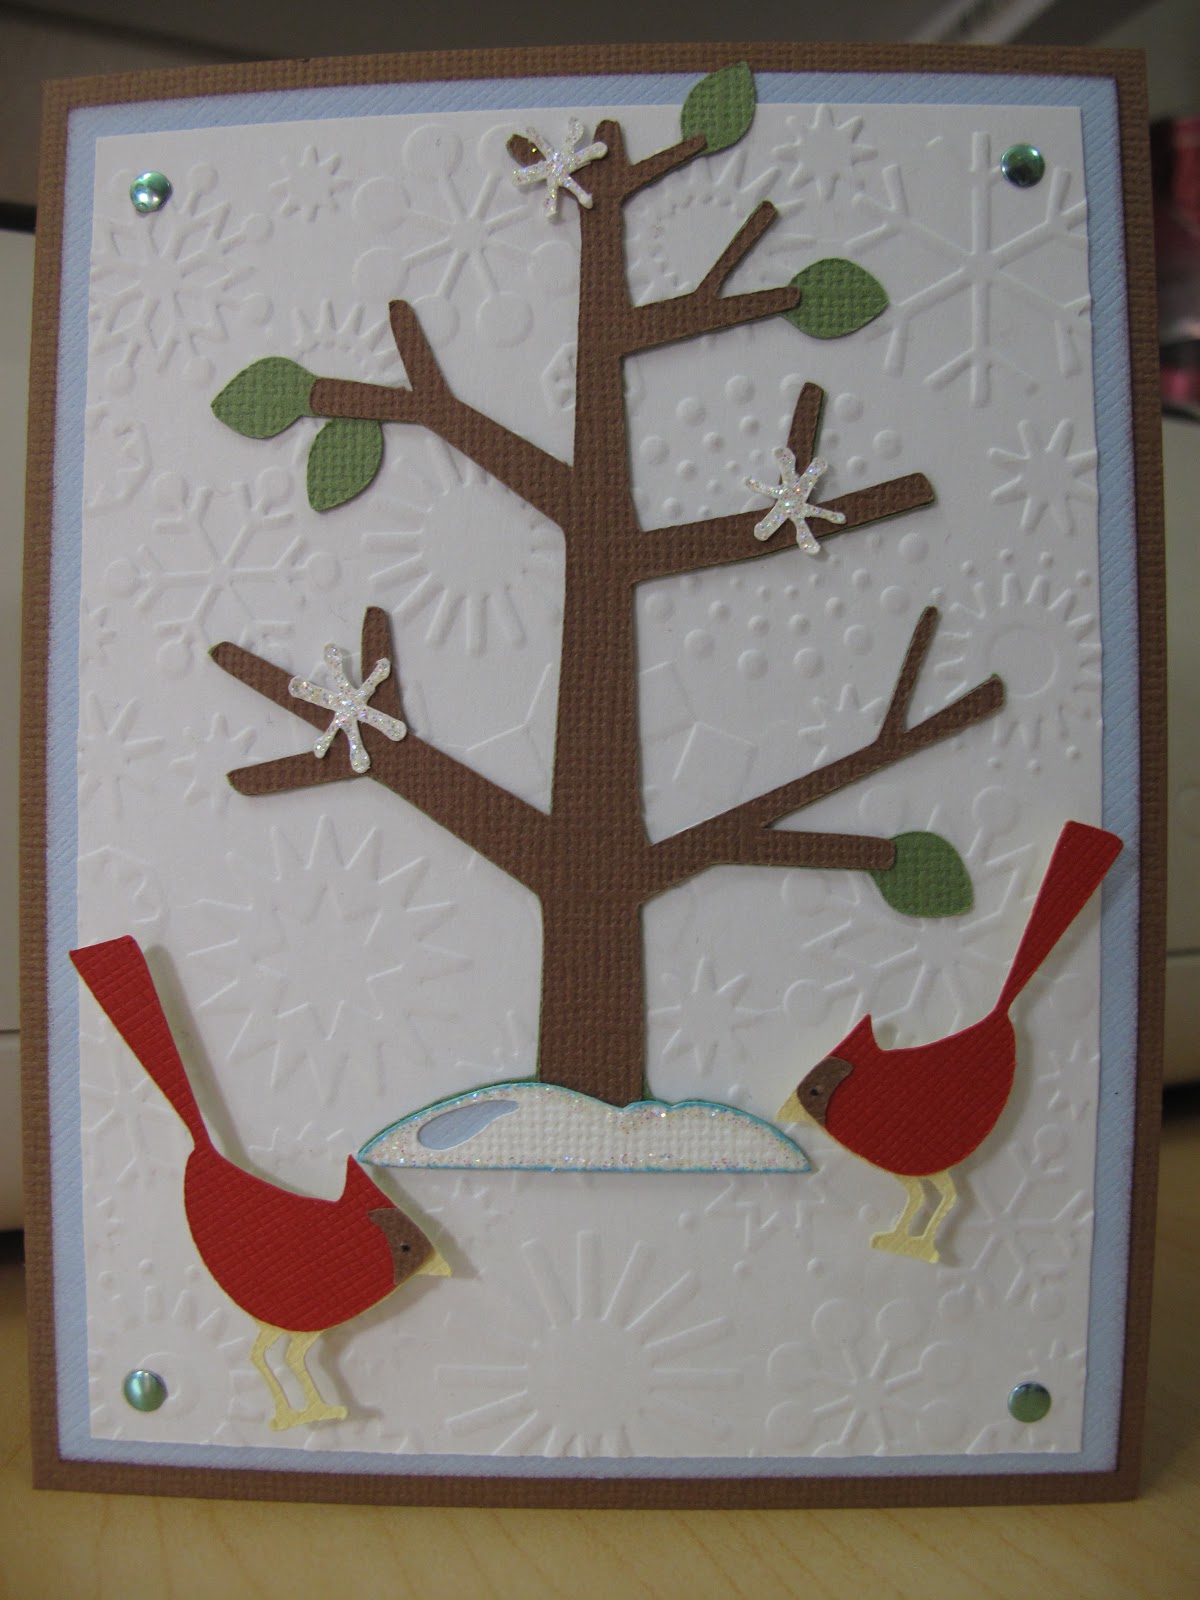
Well here we are at the half way point with Day 6 of my 12 Days of Christmas event. Today is another bird card. I saw a card similar to this on a blog but I can't remember where and fell in love with it so I decided to recreate it.
     I started with cutting the birds from Winter Wonderland at 1-1/2" & 1-3/4". I then cut the tree from Jolly Holidays at 4". I used some Stickles in Star Dust on the snowflakes and the snow on the bottom of the tree. I then used some Color Box chalk ink on the snow as well. I Cuttlebug the white layer with the Snowflake plate and placed it on the light blue layer. I placed the cut on top as shown and used my I-Rock tool to place a light blue stud in each corner. I adhered the whole thing to the brown card base with my ATG. Here are the details:

  • Cricut carts: Winter Wonderland & Jolly Holidays
  • Paper: Bazzill
  • Stickles: Star Dust
  • Blue studs: I-Rock tool
  • Cuttlebug: Snowflakes plate
  •  Ink: Color Box Cat Eye Chalk Ink in Blue Lagoon
  • Adhesive: Ek Success 2 way glue, Scotch
Enjoy and thanks for looking!

Monday, December 3, 2012

12 Days of Christmas - Day 3

Wow, I have made it to day #3. Today I decided to complete more of a girly type Christmas card. I wanted something cheery and bright and pink! I cut the girl from Winter Frolic at 3.5". I used a foam dot on the present to give some dimension. I used my Cuttlebug and Snowflake embossing plate to emboss the white layer. I then wrapped it with the green glitter ribbon and taped it on the back. I placed the girl on with my tape gun. I stamped the front with a My Pink Stamper stamp from "Biggie Christmas" with black ink. Using my I-Rock tool I adhered 4 pink studs in each corner. I then put adhesive on the back of the white layer and adhered the whole thing on top of a pink card. Here are the details:

  • Cricut cart: Winter Frolic
  • Cuttlebug: Snowflakes
  • Paper: Bazzill
  • Ribbon: Offray
  • Stamp: My Pink Stamper "Biggie Christmas"
  • Ink: Versafine
  • Studs: I-Rock
  • Adhesive: 3M, Ek Success, Scotch

Sunday, December 2, 2012

12 Days of Christmas - Day 2


Well, here we are with day #2 of my 12 Days of Christmas event. Here is a card that I did that was inspired by the little birdie on it. The minute I saw this bird I have been wanting to make this card and thought it would be perfect for now. 
     I cut the bird out at 4" from the cartridge 3 Birds on Parade. I embossed the white layer with my Cuttlebug using Snowflakes. I then tied some ribbon around and knotted it on the front. I printed the sentiment off of my computer and adhered it on. 

Saturday, November 10, 2012

Turkey Card

Here is the Thanksgiving card I am sending out this year that I said I would post today. I made 5 cards in this style all together. I did it in assembly line fashion which helped a lot. You wouldn't think that they would take up so much time, but they did. I am also working on some others including some Christmas ones with snowflakes that I will post later. But here are the details for this card:


  • Cricut cart.: Create A Critter
  • Paper: Bazzill
  • Ribbon: Offray
  • Cuttlebug: Swiss Dots
  • Punch: Marvey/Uchida
  • Adhesive: 3M, Scotch