Sunday, December 16, 2012

Hot Chocolate Cup card

Here is another Christmas card or just an everyday winter day card as it is not Christmas related. This would be great for those friends or family members who don't celebrate the holidays. This card is so super simple to make.
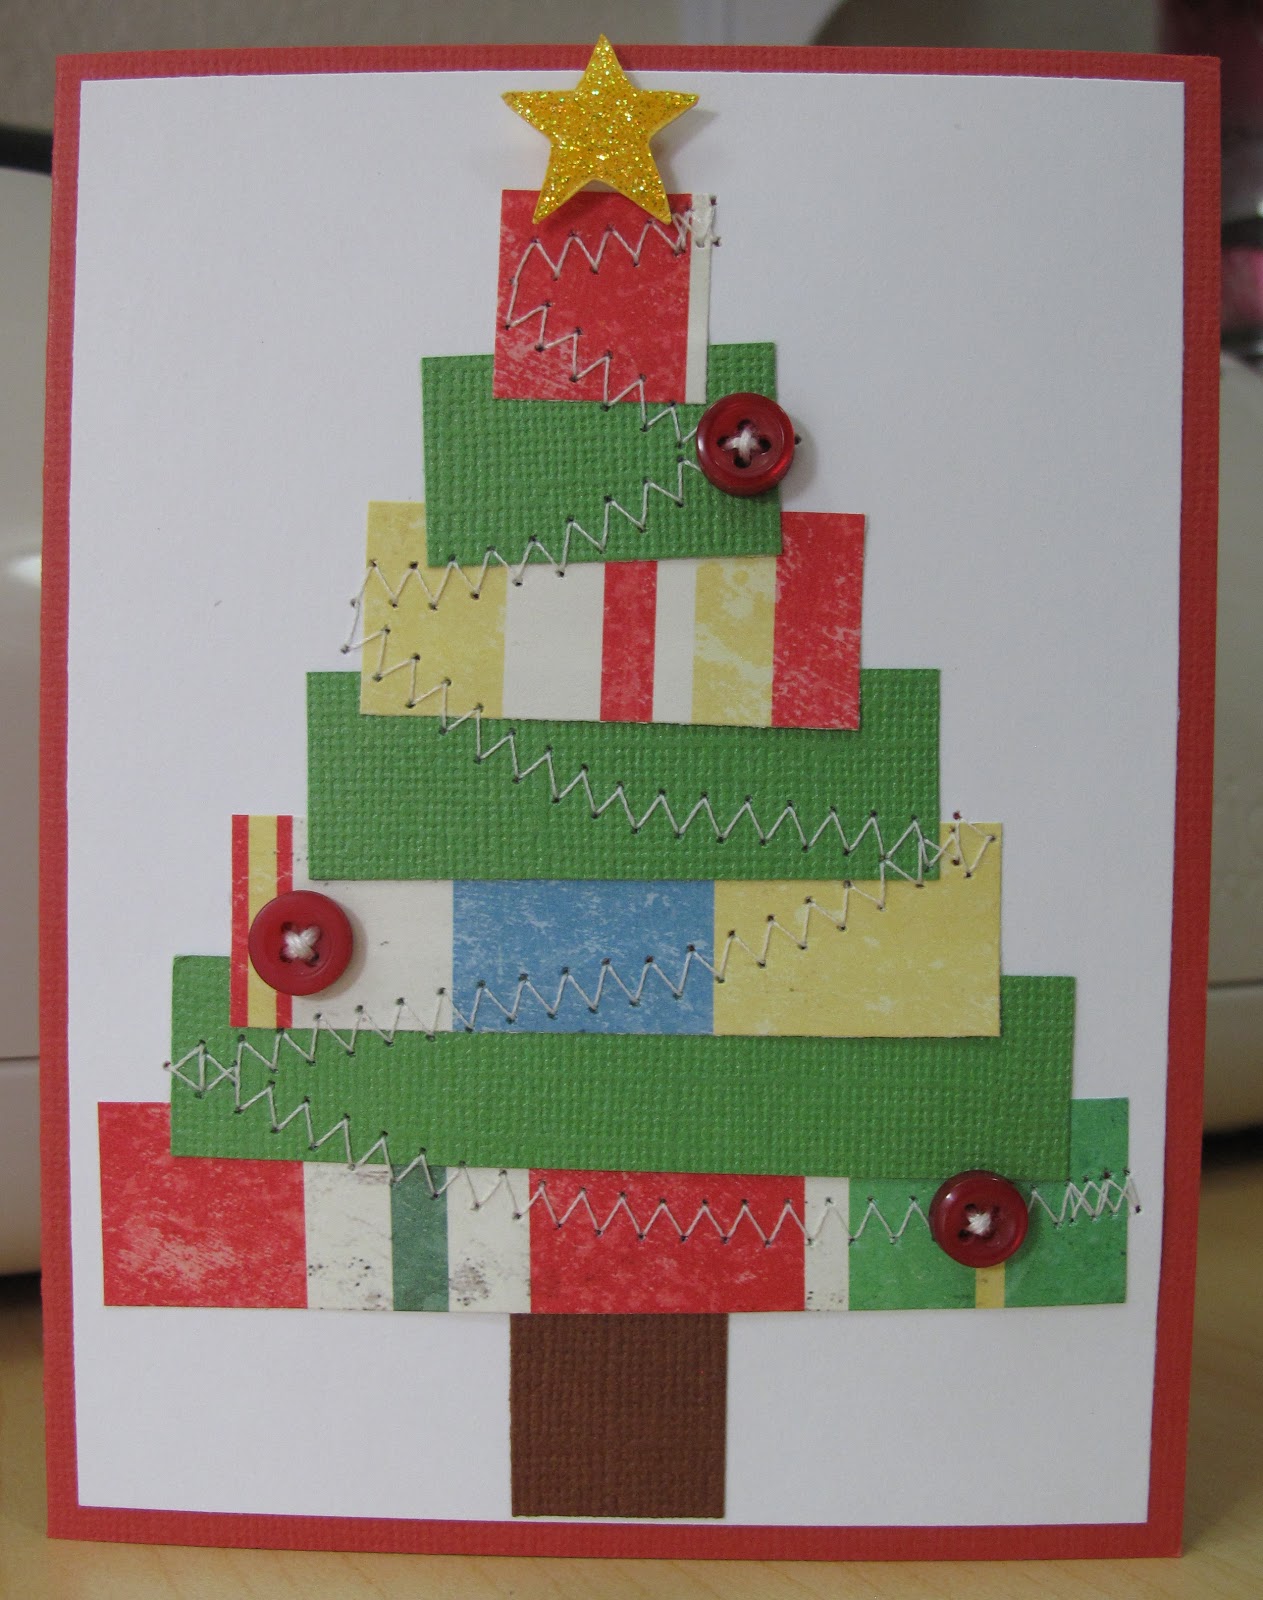
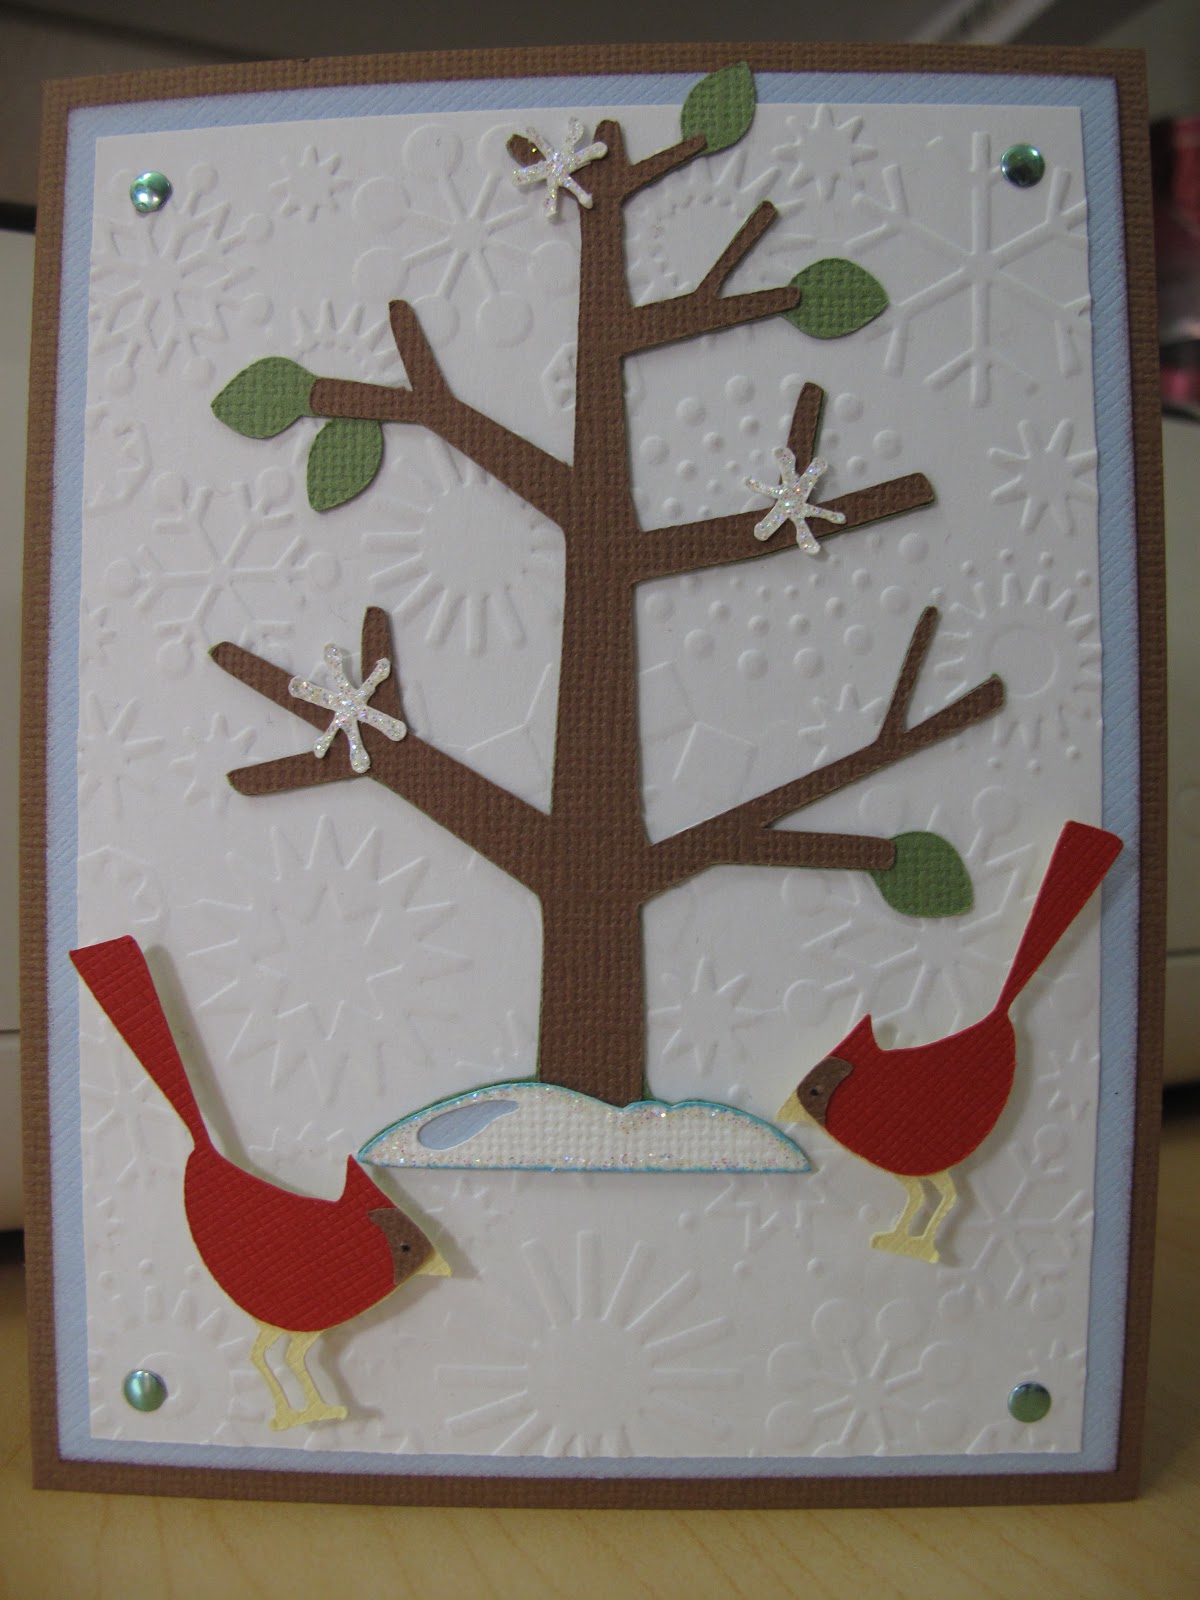
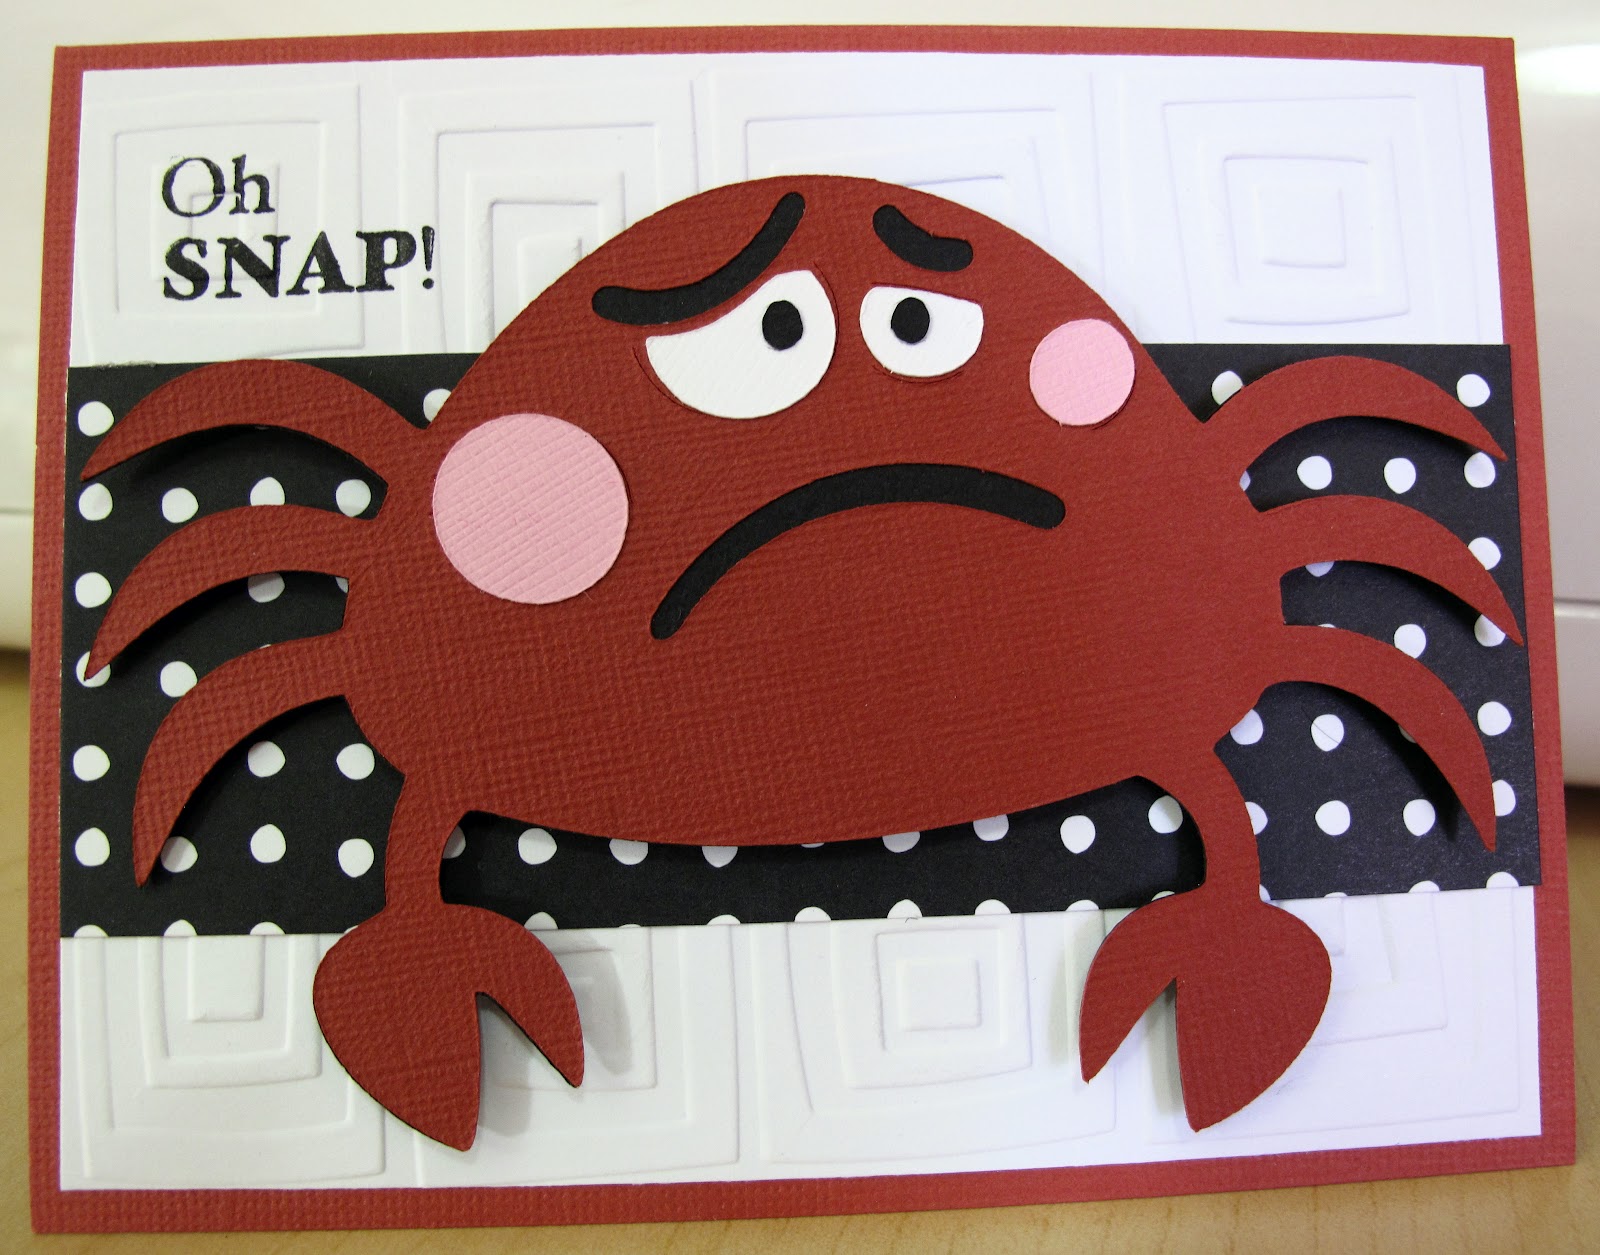
     I used the Cricut cartridge Winter Frolic. This has completely become my favorite go to cartridge for the holidays and winter cuts. I cut the cup at 4-1/2" with the card being 4-1/4"x 5-1/2". I used my Cuttlebug and Swiss Dots folder on the layer and then stitched around the edge. It's hard to see in the picture. I then placed the cup onto this layer using pop dots and then stamped the saying from My Pink Stamper "Happiest Moments". I then adhered the whole thing onto the pink card base. Here are the details:

  • Cricut card: Winter Frolic
  • Paper: Bazzill and Basic Grey
  • Cuttlebug: Swiss Dots
  • Stamp: My Pink Stamper "Happiest Moments"
  • Thread: Coats and Clark
  • Sewing Machine: Janome
Thanks for looking and please enjoy!

Saturday, December 15, 2012

Bell Card

Here is a card I did for a challenge over at Fantabulous Cricut. The challenge is to make a project with a bell on it. I choose the bell off of the Cricut cartridge Jolly Holidays. Here are the details:

  • Cricut cart: Jolly Holidays
  • Paper: Bazzill and Daisy D's
  • Ribbon: Unknown
  • Silver studs: I-Rock
  • Cuttlebug: Tag and Seeing Spots
  • Adhesive: Scotch, Ek Success Zig 2 Way Glue
I hope you enjoy it and thanks very much for looking!

Thursday, December 13, 2012

Wednesday, December 12, 2012

12 Days of Christmas - Day 12

     Well here we are at Day 12 the final day of my 12 Days of Christmas event. It has been so much fun doing this. The best part is I now have cards to mail to my family and friends in plenty of time for Christmas!:)
     For this card I didn't use my Cricut. I know shocking isn't it. I feel in love with this paper and knew it would be perfect for this type of card. Each square is a different size. Starting in the upper left corner the first square is 1-3/4" x 1-3/4". Next square is 1-1/2" x 1-1/2". The big square on the end is 2" x 3-1/2". The next row is 1-3/4" x 3-3/8". The middle square is 1-1/2" x 1-7/8". And the final bottom square is 3-1/2" x 1-3/4". These measurements are based on using a 6" x 6" card base. Here are the details for the rest of the card:

  • Paper: Bazzill, American Crafts
  • Ink: Color Box Chalk Ink in Warm Red
  • Ribbon: American Crafts
  • Punch: Martha Stewart
  • Adhesive: Scotch, Ek Success 2 Way Glue
     Thanks again for joining me in this 12 Days of Christmas event. I hope you have been inspired in some way. Have a great week and a Merry Christmas!:)

Tuesday, December 11, 2012

12 Days of Christmas - Day 11


Here is Day 11 projects! Sorry this is posted a little late but we took a road trip yesterday and my back is paying for it today:( But I did get these tags done and I think they turned out really cute.
     I started with a basic tag die that I have using my Cuttlebug. I then created the reindeer from Create-a-Critter at 3" and the mouse and presents from Winter Frolic both at 2-3/4". Here are the details:
Reindeer:

  • Cricut cart: Create-a-Critter
  • Paper: Bazzill, American Crafts
  • Stickles: Xmas Red, Gold
  • Red Stud: I-Rock
  • Stamp: My Pink Stamper "Biggie Christmas"
  • Ink: Versafine
  • Adhesive: Scotch, Ek Success 2 Way Glue
Mouse:
  • Cricut cart: Winter Frolic
  • Paper: Bazzill, Basic Grey
  • Stickles: Glam Pink
  • Pink Stud: I-Rock
  • Stamp: My Pink Stamper "Biggie Christmas"
  • Ink: Versafine
  • Adhesive: Scotch, Ek Success 2 Way Glue
Presents:
  • Cricut cart: Winter Frolic
  • Paper: Bazzill, American Crafts
  • Stickles: Baby Blue, Turquoise, Yellow, Firefly
  • Blue Studs: I-Rock
  • Stamp: My Pink Stamper "Biggie Christmas"
  • Ink: Versafine
  • Adhesive: Scotch, Ek Success 2 Way Glue
Well only 1 more day to go. The time has gone by quickly. I hope you have enjoyed what I have had to share and thanks for looking.

Monday, December 10, 2012

12 Days of Christmas - Day 10

Here we are with Day 10! I can't believe how fast this time went. I am back using my Cricut for the main cut. 
     I used Create-a-Critter for the reindeer cutting it at 4". After putting it together I used Stickles for the nose and collar. I then used my I-rock tool again to place a red stud where the knot would be. I next took a piece of pattern paper and cut it to 1' x 4' and placed it vertical on my card layer. I then took some white ribbon and tied it around the small piece of pattern paper. I pop dotted the reindeer on and then using my ATG I adhered the whole thing onto a white card stock base. Here are the details:

  • Cricut cart: Create-a-Critter
  • Paper: Bazzill, American Crafts
  • Ribbon: Offray
  • Stickles: Xmas Red, Gold
  • Red stud: I-Rock tool
  • Adhesive: Scotch, Ek Success 2 Way Glue & Pop Dots
Thanks for looking and I hope you have a creative day!:)

Sunday, December 9, 2012

12 Days of Christmas - Day 9

Well here is another Christmas tree card to help inspire you. I got the inspiration from Two Peas in a Bucket gallery here. And believe that I only used my Cricut to cut out the star. That's a shocker! Lol.
     I started by picking 2 papers that contrasted nicely with each other and a brown for the trunk. I cut the trunk at 3/4" x 1" and glued it down. I cut the first layer to be 3/4" x 3-3/4" and glued it down having it overlap the trunk a little. The next layer was cut to 3/4" x 3-1/4" and glued down. I continued cutting layers each time reducing by 1/2" until I had 7 layers. I then used my sewing machine and white thread to make "garland" by going back and forth with the needle. I then took some white thread and 3 red buttons and adhered them on. I cut out the star at 3/4" and used a pop dot the place it on the card. I used Stickles in Yellow and colored it in. I then adhered the whole thing onto a red card base. Here are the details:

  • Cricut cart: Plantin Schoolbook
  • Paper: Bazzill and Daisy D's
  • Stickles: Yellow
  • Buttons: Foof-a-La
  • Thread: Coats & Clark and DMC
  • Sewing machine: Janome
  • Adhesive: ATG, Ek Success 2 Way Glue, and Scotch
Thanks again so much for looking at my cards. It means a lot to me. Enjoy and have a great weekend!:)

Saturday, December 8, 2012

12 Days of Christmas - Day 8

Today I have a really simple card for you. The whole card took me about 20 min to make so these would make great last minute cards to give away with holiday goodies or to send to family and friends. I got the idea here. I fell in love with it the minute I saw it and knew I wanted to try and make it too.
     The tree only consists of different size circles that I cut on my Cricut using Plantin Schoolbook. I cut the circles at 2", 3", 4", and 5", but you could use any sizes you like. I then folded each circle in half then turned it and folded it in half again. Then you just fold in the sides and push the circle flat. I then glued the smallest circle down first leaving room for my star. Then I placed the next circle inside of the smaller circle and glued it down. Repeat with each remaining circle. I Cuttlebug the green layer before I did any gluing and then put a red stud in each corner with my I-Rock tool. I love that thing!:) I cut the star from my Cricut as well using the same cartridge at 3/4". I used Icicle Stickles to make it sparkle like a star should. I glued the whole thing onto a red card base using my ATG gun. Here are the details:

  • Cricut cart: Plantin Schoolbook
  • Paper: Bazzill and Basic Grey
  • Cuttlebug: Paper Studio-Swirls
  • Studs: I-Rock tool
  • Stickles: Icicle
  • Adhesive: Scotch, and Ek Success 2 Way Glue

     I hoped you enjoyed today's card and I will see you again tomorrow for day 9. Thanks for looking!:) 

Friday, December 7, 2012

12 Days of Christmas - Day 7

The picture doesn't do this card justice. The layer under the stocking is suppose to be a pretty bright, light green color. I'm going to try and take a better one later. 
     Well here we are with Day 7 and I really love how cute this card is. I started with using Winter Frolic again to make the stocking. I used the pretty pink instead of the red/blue combo they had. I inked the edges with Chalk Ink in Rouge. After I was finished I adhered the green layer onto the pattern paper and then I sewed around the edges of it. I used a stamp from My Pink Stamper for the bottom and then pop dotted the stocking onto the front. I then adhered the whole thing onto a white card base. Here are the details:

  • Cricut cart: Winter Frolic
  • Paper: Bazzill and Basic Grey
  • Stamper: My Pink Stamper "Biggie Christmas"
  • Ink: Versafine in Black and Color Box Chalk Ink in Rouge
  • Thread: Coats and Clark
  • Sewing machine: Janome
  • Adhesive: Scotch, Ek Success Pop Dots
Thanks for looking again and I will see you tomorrow!:)

Thursday, December 6, 2012

12 Days of Christmas - Day 6

Well here we are at the half way point with Day 6 of my 12 Days of Christmas event. Today is another bird card. I saw a card similar to this on a blog but I can't remember where and fell in love with it so I decided to recreate it.
     I started with cutting the birds from Winter Wonderland at 1-1/2" & 1-3/4". I then cut the tree from Jolly Holidays at 4". I used some Stickles in Star Dust on the snowflakes and the snow on the bottom of the tree. I then used some Color Box chalk ink on the snow as well. I Cuttlebug the white layer with the Snowflake plate and placed it on the light blue layer. I placed the cut on top as shown and used my I-Rock tool to place a light blue stud in each corner. I adhered the whole thing to the brown card base with my ATG. Here are the details:

  • Cricut carts: Winter Wonderland & Jolly Holidays
  • Paper: Bazzill
  • Stickles: Star Dust
  • Blue studs: I-Rock tool
  • Cuttlebug: Snowflakes plate
  •  Ink: Color Box Cat Eye Chalk Ink in Blue Lagoon
  • Adhesive: Ek Success 2 way glue, Scotch
Enjoy and thanks for looking!

Wednesday, December 5, 2012

12 Days of Christmas - Day 5


I really loved doing today's card. We are now on Day 5 of my 12 days of Christmas event and I am having so much fun doing this. I can't believe tomorrow is my half way point. This has been a blast.
     On today's card I started by using Cricut cartridge Winter Frolic. I cut the image out at 4". I knew I wanted to cover most of the card with it so this was the perfect size. After putting the image together, I then took some Stickles and using color Xmas Red I colored in the red ribbon. I also colored the pom pom on the bird's hat with Star Dust. After they dried I used my I-Rock tool and placed a red stud where the knot would be on the bow. It had no trouble sticking to the Stickles. While it cooled I placed the snowflake paper on top of the dark blue layer and using my sewing machine sewed around the edges leaving about an 1/8" margin. I then adhered the layers to the white card base and then adhered the birdhouse image on top. On the inside of the card I stamped the phrase from My Pink Stamper Biggie Christmas using black ink.. Here are the details:
  • Cricut cart: Winter Frolic
  • Paper: Bazzill and Kaiser craft
  • Stickles: Xmas Red and Star Dust
  • Red stud: I-Rock tool
  • Thread: Coats and Clark
  • Sewing machine: Janome
  • Stamp: My Pink Stamper "Biggie Christmas"
  • Ink: Versafine
  • Adhesive: Scotch
I hope you all have been inspired by today's card and thank you very much for joining me during this event!


Tuesday, December 4, 2012

12 Days of Christmas - Day 4

Day 4 and we have another snowflake card. I'm really into snowflakes this year. You see them on everything. They make an excellent non religious holiday item for those people who would prefer that.
     I started with using Cricut cartridge Winter Wonderland to cut the snowflake at 4". I used a glitter white paper to do so, though you can't tell in the picture. I then used a brad to place the snowflake on. In each spike of the snowflake I placed a small rhinestone using my I-Rock tool. I then used a boarder punch on the light blue layer. I adhered the snowflake to the light blue layer then the whole thing onto the dark blue card.
     My tip for working with dark cards is to place a white layer inside the card for easy writing on. Here are the details:

  • Cricut cart: Winter Wonderland
  • Paper: Bazzill, Colorbok, and Kaiser
  • Punch: Martha Stewart
  • Brad: Making Memories
  • Rhinestones: I-Rock
  • Adhesive: ATG
Thanks for joining me again today and I will see you tomorrow with another new project!

Monday, December 3, 2012

12 Days of Christmas - Day 3

Wow, I have made it to day #3. Today I decided to complete more of a girly type Christmas card. I wanted something cheery and bright and pink! I cut the girl from Winter Frolic at 3.5". I used a foam dot on the present to give some dimension. I used my Cuttlebug and Snowflake embossing plate to emboss the white layer. I then wrapped it with the green glitter ribbon and taped it on the back. I placed the girl on with my tape gun. I stamped the front with a My Pink Stamper stamp from "Biggie Christmas" with black ink. Using my I-Rock tool I adhered 4 pink studs in each corner. I then put adhesive on the back of the white layer and adhered the whole thing on top of a pink card. Here are the details:

  • Cricut cart: Winter Frolic
  • Cuttlebug: Snowflakes
  • Paper: Bazzill
  • Ribbon: Offray
  • Stamp: My Pink Stamper "Biggie Christmas"
  • Ink: Versafine
  • Studs: I-Rock
  • Adhesive: 3M, Ek Success, Scotch

Sunday, December 2, 2012

12 Days of Christmas - Day 2


Well, here we are with day #2 of my 12 Days of Christmas event. Here is a card that I did that was inspired by the little birdie on it. The minute I saw this bird I have been wanting to make this card and thought it would be perfect for now. 
     I cut the bird out at 4" from the cartridge 3 Birds on Parade. I embossed the white layer with my Cuttlebug using Snowflakes. I then tied some ribbon around and knotted it on the front. I printed the sentiment off of my computer and adhered it on. 

Saturday, December 1, 2012

12 Days of Christmas - Day 1

Well here we are with Day #1 of my 12 Days of Christmas projects and I start today as you can see with a card. I wanted to start with a simple item that could be easily recreated as in hopes of inspiring someone who would like to make their own cards this year but feel it can be a little over whelming to do so. This card is really easy to make and it doesn't necessarily need to be Christmas related for those friends you have that celebrate a different holiday. I did get the idea from a fellow blogger but as I didn't have the same Cricut cart I used my own ideas for it. 
     I cut the flourish from Gypsy Font at 1.75". I then adhered it to the ivory layer with adhesive. I cut the snowflake from Winter Wonderland at 2.25". I placed a rhinestone with my I-Rock tool in the center of the snowflake and then pop dotted the snowflake on top of the flourish. I stamped both cards with My Pink Stamper "Biggie Christmas". I then adhered the layer into the card. Here are the details: 

  • Cricut cart: Gypsy Font & Winter Wonderland
  • Paper: Bazzill
  • Rhinestones: I -Rock
  • Stamps: My Pink Stamper "Biggie Christmas"
  • Ink: Versafine
  • Adhesive: 3M, Ek Success

Friday, November 30, 2012

12 Days of Christmas

Good morning everyone! I hope you are having a great start to the holiday season and if not then I hope that it gets better for you.:) Well, I have decided after truly thinking deeply about it that I am going to do 12 Days of Christmas. This will mean that starting Dec 1st I am going to post a new post of some type of Christmas project. It can be a card, scrapbook layout, home decor item: something Christmas related. I do have to say that it will probably be more cards then other projects, but I do hope to have a few different ideas to offer. I have been wanting to do this for a couple of years now and my health and time have finally permitted it. I hope you all enjoy what I have to offer as far as projects and maybe even inspire someone. I get a lot of motivation from other people's blogs when they complete similar ideas such as this so I am hoping this does help as I complete the projects each day.
Thanks for letting me rattle a little. I hope you join me tomorrow as I post my first project. Thanks again!

Thursday, November 29, 2012

Quick Update

Well here I am. These last 2 weeks have been a nightmare gone really bad. I hurt my back a week before Thanksgiving and still was not back to normal by the holiday. I was unable to move and didn't leave bed much. I did have 1 of my sons over for Thanksgiving along with 2 of his friends which was very nice. This past Monday my back took a turn for the worst and I ended myself up in the ER. After spending the day there and taking steroids for the past 3 days, I am feeling a hundred times better. I'm not quite back to my norm but I am on the way there thank goodness.
I have a special event happening starting on 12/1 so tune in then to see what I am up to. Thanks and see you then!

Thursday, November 22, 2012

Happy Thanksgiving

I want to wish everyone a wonderful and enjoyable:
Happy Thanksgiving!

Saturday, November 10, 2012

Turkey Card

Here is the Thanksgiving card I am sending out this year that I said I would post today. I made 5 cards in this style all together. I did it in assembly line fashion which helped a lot. You wouldn't think that they would take up so much time, but they did. I am also working on some others including some Christmas ones with snowflakes that I will post later. But here are the details for this card:


  • Cricut cart.: Create A Critter
  • Paper: Bazzill
  • Ribbon: Offray
  • Cuttlebug: Swiss Dots
  • Punch: Marvey/Uchida
  • Adhesive: 3M, Scotch

Friday, November 9, 2012

I'm Back!!

Wow! I can't believe that it has been so long since I last posted. I meant to post the after video of my scraproom a week later, but...

I lost all motivation to do anything crafty related. I don't know where I lost it, but it couldn't be found until only a few days ago. :) I have depression along with a few health issues and when one of these health issues act up then the depression kicks in big time. And when my depression kicks in then all motivation goes bye-bye. What has helped the most is I have started selling my cards at a local shop. And now with the holidays coming I need to get some of my card sets into the store for sale. This has helped somewhat with getting my motivation going in the right direction. I have a few ideas that I can't wait to get going on and should start as early as tomorrow. I have been working on Thanksgiving cards that are almost done. I'm waiting on some clear bags and boxes that I ordered online to get here so I can place them in the store.

Well, that is enough for now. I really needed to get this out so that I can get going on one of the few things that make me happy...crafting! I will have some new pics up tomorrow/Saturday. Thanks for reading this. :)

Friday, August 24, 2012

Scraproom Before Tour Video

Here is a video of my scraproom that I posted on YouTube. It's just a before tour of the room before I started doing some cleaning. I have been working all week on it and will have an After Tour of my scraproom sometime at the beginning of next week. Enjoy and please leave me comments about what you think. Thanks!

Scraproom Before Tour

Friday, August 3, 2012

Monday, July 30, 2012

More Layouts


Here are 2 more layouts I have completed the last couple days. Suprisingly I didn't use any Cricut cuts on them. Hmmm I must be losing it. Lol. The top is of my Savannah cat Keyka and the bottom is of me and my friend's newborn baby girl Brittany.

NAS Design Team Submission

Wow! Three posts in the past week. I'm doing good here. Now I just need to keep up with my projects and get them all on here for all to see. Here is my submission for the Nuts About Sketches Design Team call. I had so much fun with Shawn's sketch. I turned it on it's side to accommodate my pictures. Here are the details:

  •  Cricut cart: Boys Will Be Boys
  • Paper: DCWV
  • Star brads: Making Memories
  • Star clip: Making Memories
  • Ribbon: Michaels
  • Wood frames: Unknown
Please enjoy my submission and have a great day.

Saturday, July 28, 2012

Christmas in July card

Alright I know it has been almost a month with no posting what so ever. Shame on me! Lol. I have been so unmotivated to do any scrapping. I think the motivation bug needs to come and bite me in the butt! I have made a couple cards but nothing else. I need to do some serious scrapping here. Maybe I will work on a lo.
Well, here is my newest card. I made it for My Craft Spot's Christmas in July post. I cut Hello Kitty at 5" with the card being 4 1/4 x 5 1/2. Here are the details:

  • Cricut cart: Hello Kitty Greetings
  • Paper: Bazzill
  • Ribbon: Really Reasonable Ribbon
  • Thread: Coats & Clark
  • Sewing machine: Janome
  • Adhesive: ATG, Zig 2 way glue pen
Well, enjoy the card and I hope to be back on here real soon. A lot sooner! Lol.

Monday, July 2, 2012

Pineapple card

I can't believe it has been a bit since my last post. I don't like going that long but motivation has been real slow coming to me. I often need a kick start to get going. When your days are filled with nothing but scrapping or anything else I want to do, it gets kind of boring after a while (I'm disabled so I don't work). My Craft Spot is having a challenge to create an item with bright summer colors. Also Fantabulous Cricut is having a challenge to create an item too with a BBQ or picnic food. My creation included both. Here are the details:


  • Cricut cart: Life Is A Beach
  • Cardstock: Bazzill
  • Pattern paper: Kaiser Craft
  • Ink: Cat's Eye-Dark Brown
  • Adhesive: ATG, Zig 2 way glue
Enjoy and thanks for looking!:)

Thursday, June 21, 2012

Love Tag Album

Here is a little Tag album I put together with some scraps from a monthly kit I receive. This is my first time working with chipboard to make such an album and I was so excited to do so. It is 3"x4" and the front and back covers are Mod Podged for added stability. This is the title page. 
 This is page 2 and 3.
 Here is page 4 and 5. I used Wild Card cart to make the coin envelope.
 This is 6 and 7. You can put a tag or pic behind the rhinestone half page.
 Here is 8 and 9. You can slip something behind the ribbon.
 Here is page 10 and 11.
And here is the back cover. Both the front and back covers are covered with shiny Mod Podge. Here are the rest of the details:
  • Cricut cart: Wild Card
  • Cardstock: Bazzill
  • Pattern paper: Jillibean Soup "Hearty Barley Soup"
  • Ribbon: Ofray and CTMH
  • Tag messages: Jillibean Soup Labels
  • Bling: Own stock
  • Mod Podge: Plaid-paper and shiny
  • Adhesive: ATG, Zig 2 way glue, Glue Dots
I hope you enjoyed looking at the album as much as I had at making it. Thanks for looking. And  I LOVE comments so please leave one and let me know how I did. Thanks again.

Wednesday, June 20, 2012

Monday, June 18, 2012

Popsicle card

Here is my latest creation and I loving how bright it is! Lately I have been using nothing but plain cardstock so I decided to use some pattern paper with this challenge over at My Craft Spot. I instantly knew which pp I wanted to use for this too. The challenge is to create something with a popsicle, ice cream, summer treat, etc. on it. Here is the details:

  • Cricut cart: Smiley Cards
  • Cardstock: Bazzill
  • Pattern paper: Kaiser Scrapbook, Provo Craft
  • Ribbon: Ofray
  • Stamp: My Pink Stamper "Sweetest Cupcakes"
  • Ink: Versafine "Black"
  • Pen: Inkssentials
Please enjoy this card by leaving a comment. Thanks so much for looking! :)

Saturday, June 16, 2012

Fire Truck card

Here is my Father's Day card for my dad. It took me some time to figure out what I wanted to do. Then I saw this fire truck from the cartridge "Boys Will Be Boys" and knew it was perfect. My dad used to work for the fire dept a few years back so I knew he would love this card. I heard from my mom today that the card got there fine and he will open it up tomorrow :) Here are the details:
  • Cricut cart.: Boys Will Be Boys
  • Paper: Bazzill
  • Embossing: Cuttlebug "Diamond Plate"
  • Stickles: Xmas Red and Yellow
  • Stamp(inside): My Pink Stamper "Happiest Moments"
  • Ink: Versafine-Black
  • Adhesive: ATG, Zig 2 Way Glue Pen
Thanks so much for looking. I am entering this card in the My Craft Spot challange. It is King of the Grill: Make a card for your dad or special someone in your life.
Enjoy!

Thursday, June 7, 2012

Ladybug card

I had a blast making this card. As a suggestion you could easily use red metallic paper instead of red stickles like I did. I created this card using the following:
  • Paper: Bazzill
  • Cricut cart: Live Simply
  • Brads: Doodlebug
  • Ribbon: Ofray
  • Cuttlebug: Paisley
  • Glitter: Stickles
    Adhesive: 3M, Scotch

Tuesday, June 5, 2012

Halloween Bird card

Now I have been busy the last couple days scrapbooking like crazy. Altogether I made 7 cards. Now, I know it is only June and Halloween is 5 months away, but I couldn't help making this card. I got 3 Birds on Parade in the mail yesterday and wanted to use it so bad. I have seen My Pink Stamper make this card so I used her example just different paper. Here are the details:
  • Cricut cart: 3 Birds on Parade
  • Paper: Bazzill, Prima
  • Stamp: My Pink Stamper "Spooky Puns"
  • Ink: Versafine
  • Ribbon: Recollections
  • Stickles: Black Diamond, Lime Green
Well, I am off to make some more. Boy do I love this. I hope you enjoy them all and have a great week. Thanks for looking! :)

Cupcake Birthday cards

Here is a couple of other cupcake cards I made. I made 5 altogether. It is nice to have a few extra on hand for birthday emergencies. I had a friend come over the other day to purchase a birthday card for a little girl and I was so happy to have one on hand for her. Here are the details:
  • Cricut cart: Sweet Treats
  • Paper: Bazzill, Georgia Pacific
  • Cuttlebug: "Happy Birthday"
  • Stickles: Icicle, Diamond
  • Ribbon: Purcahsed on Ebay
  • Brads: MM
    Adhesive: 3M, Scotch
Thanks again for looking!

1st Birthday card

I am doing this card for My Craft Spot. The challenge is to do a birthday card with an age on it. I thought what is more exciting then the first birthday. I used stickles on the flame to give it a little sparkle, plus instead of a setiment on the front I embossed the white layer with my Cuttlebug. Here are the details:
  •  Cricut cart.: Sweet Treats
  • Paper: Bazzill
  • Cuttlebug: "Happy Birthday"
  • Ribbon: Offray
  • Stickles: Xmas Red
  • Embellies: Own stock
  • Adhesive: 3M, Scotch
Please enjoy this card and thanks for looking! :)

Thursday, May 31, 2012

Thank You Card

It's been a little bit since my last post. I just have not been scrapping a whole lot lately until today. Here is my latest creation. I got the inspiration from a card layout in "Cards" magazine June 2012 pg.115. The minute I saw it I wanted to repoduce it. I even used my imagine to make some of the paper. Here are the details:
  • Cricut carts: Forever Young, Imagine Black & White
  • Cardstock: Bazzill
  • Pattern paper: DCWV and Imagine
  • Stamp: My Pink Stamper "Itty Bitty-licious
  • Ink: Versafine Black
  • Flowers: Prima and own stock
  • Ribbon: All My Memories
  • Sewing Machine: Janome
  • Thread: Coats & Clark
  • Adhesive: ATG, EK Success pop dots
  • Button: Own stock
Whew...that was a lot. Usually my cards aren't this detailed. Thanks for looking and I hope you enjoy!

Monday, May 21, 2012

Grad card

Here is a card I did for both My Craft Spot and Fantabulous Cricut.  Both sites were having the challenge of creating a graduation project so I choose Hello Kitty. I wanted something cute for a Graduation project. Here are the details:
  • Cricut cart: Hello Kitty Greetings
  • Paper: Bazzill
  • Stamp: My Pink Stamper " Happiest Moments"
  • Ink: Verafine
  • Embossing folder: My Paper Studio
  • Ribbon: Offray
  • Adhesive: Zig 2 way glue
Thanks for looking!

Sunday, May 13, 2012

Laundry card

Here is my creation for the challenge over at My Craft Spot. You need to make something that is country, down on the farm related. I got out my Country Life cartridge and looked through it and then remembered I had a great stamp to go with the laundry cut. So that was the one I picked. It also reminded me of my Grandma putting her clothes out on the line. Here are the details:
  • Cricut cart: Country Life
  • Paper: Bazzill
  • Twine: Own stock
  • Eyelets: Doodlebug
  • Stamp: My Pink Stamper "More Punny-licious"
  • Adhesive: Zig 2 way, Scotch Quick Dry
Thanks for looking and Happy Mother's Day to all the moms out there!

Girly Shoe card

It has been awhile since I have posted on here. I was starting to have withdrawals :) I was being so good too. Oh well. It decided to make a card for my sister just to let her know that I am thinking of her. I really love the way it turned out too! I used Rock Princess for the shoe. I have been wanting to make this cut ever since I got this cart. I hope she likes it. Here are the details:


  • Cricut cart: Rock Princess
  • Paper: Bazzill
  • Stamp: My Pink Stamper "Pinka-licious"
  • Cuttlebug: D'vine Swirl
  • Ink: Verafine "Black"
  • Adhesive: Zig 2 way glue, Scotch "Quick Dry"

Friday, May 4, 2012

Oh Snap! card

Hello everyone! Happy Scrapbooking Day. I hope you have big plans for tomorrow. I got started today with this really cute card. I love this card and purchased this cartridge just for it.:) There are several other cute faces on the cartridge, but this is definitely my fav. Here are the details:

  • Cricut cart: Smiley Cards
  • Paper: Bazzill and unknown
  • Stamp: My Pink Stamper "Even More Punny-licious"
  • Ink: CTMH
  • Adhesive: Zig 2 way glue, 3M
Enjoy!

Tuesday, May 1, 2012

Christmas in May card

I know that it is only May, but I wanted to do this card for a challenge on Christmas Card Challenge. The challenge was last week so I missed it, but I loved the idea of it so I went ahead and just did it. That's a good idea too. If you are stuck and need some inspiration just find a challenge, new or old, or make one up of your own. Here are the details:
  • Cricut cart: Create a Critter
  • Paper: Bazzill & AMC
  • Ribbon: Offray
  • Stamp: My Pink Stamper "Biggie Christmas"
  • Ink: Color Box
This card was so much fun to make. It was a lot less stressful to make it in May then late November, that's for sure. Lol. Enjoy!

Saturday, April 28, 2012

Scooter card

Here is my newest card. I did this card for 2 different challenges. One at My Craft Spot and the other at Fantabulous Cricut. Both were doing "Things that go". This is the first time using this cartridge too. I love it! What a blast puting it all together. My favorite part are the flowers. I love the look.
Here are the details:
  • Cricut cart: Sweethearts
  • Paper: Bazzill
  • Ribbon: Michael's
  • Flowers: Prima
  • Cuttlebug folder: D'vine Swirl
  • Bling: I Rock
  • Pen: Inkssentials
  • Adhesive: ATG, 2 Way Zig pen 

Thursday, April 26, 2012

Birthday Cards

Here are my latest creations. I decided that I wanted to just make some generic cards to have on file for when needed. So today's cards are for birthdays. I did a mix of girl and boy. I cut them all at 4-1/4". I think they turned out cute!


Here are the details:
  • Cricut cart: Sweet Treats
  • Paper: Bazzill
  • Ribbon: Ofray and Michael's
  • Stamps: My Pink Stamper-Birthday Crazy
  • Ink: Versafine: Onyx Black
  • Stickles: Christmas Red
  • Adhesive: ATG and 2 Way Zig Glue
Enjoy! :)

Tuesday, April 24, 2012

Hugs Layout

Here is a layout I did of my brother and me when we were about 4 and 6. These were the good times to my understanding, before we became complete enemies to each other. We were constanly fighting over everything. On one occassion we ended up breaking the dishwasher. For the next 3 months we had to do the dishes by hand. Our parents thought it was never going to end. Then finally when we were both in high school, I a senior and my brother a sophmore, that we finally became best friends and have been ever since. I love you Rob.
Here are the details:
  • Cricut cart: Plantin Schoolbook
  • Paper: Bazzil and Kismet by Glitz Design
  • Flowers: Prima
  • Brads: Making Memories
  • Title: Thickers
  • Journal block: Memo Notebook by Jenni Bowlin
  • Ribbon: Own stash
  • Adhesive: ATG and Scotch Quick Dry

Sunday, April 22, 2012

Butterfly card

I got the idea for the butterfly from My Pink Stamper. I watched her make one and feel in love with it so I had to make one of my own. I used very simular colors because I love the way they pop off the card. I also used the card sketch idea for week 04-18-12 from Let's Scrap. I cut the butterfly at 4" and instead of putting foam dots on it like I normally would I just folded the wings back to make them "pop". Here are the details:
  • Cricut cart: Best of 2006
  • Paper: Bazzill
  • Cuttlebug: Paisley
  • Stamp: My Pink Stamp "From The Heart"
  • Ink: Verafine-Onyx Black
  • Ribbon: Making Memories
  • Adhesive: ATG and 2 Way Zig glue pen